QA Tester Beginner Series: A beginners guide to JavaScript Automation with Cypress
Hi guys and welcome to another edition of our beginner series and this time we'll be taking a look at Cypress. This will be our first multi-part blog-post for the beginner series and we intend to take an in-depth look covering everything from installation and writing our first cypress test-case in JavaScript to implementation of POM in Cypress and the Continuous Integration(CI) with the CI tool Jenkins. So this is going to be a pretty long and exciting series that should equip you with all the tools to go from Cypress newbie to expert in a not-so short space of time.
First off, i'd like to publicly state for the record that I am for the most part a Selenium guy. That's just what it is; Selenium and Java were my entry ticket to this racket and i'll continue to be a big fan of those tools but for this series i'm going to be as objective as possible. We all have tools that we get somewhat attached to but at the end of the day, it's important to remember that they're just tools. They're there to help you do a job and it is in your best interest to choose the most appropriate tools (notice how i said "most appropriate" and not "best") for the task at hand. Which is something you'll learn as you climb the tech equivalent of the corporate ladder but that's a story for another day. Now due to the industry dominance of JavaScript and how it's absolutely-positively the greatest programming language that has ever and will ever exist, i was forced to rethink my Java loyalties and consider all the other options that are out there and understand what all the hype was about; Which is why i considered making this series so you can thank all the JavaScript tech enthusiasts for this. You'll understand all the JavaScript references in a minute bear with me.
What is Cypress?
No, it is not a holiday destination but it does make front-end testing of next generation web applications feel like a holiday. And it uses JavaScript to accomplish that by addressing problematic issues such as integration challenges, wait times, syncing and execution inconsistencies that are common with selenium. Cypress is built on Node.js and uses JavaScript for writing tests but a lot of the coding in Cypress can be done using Cypress inbuilt command. An in-depth understanding the JavaScript programming language is not necessary although it can be helpful but to a degree you can write effective tests without them. Before i go into any further detail, it helps to understand what makes Cypress different from Selenium asides from the obvious when it comes to web automation.
On an architectural level, Selenium operates with a driver by running OUTSIDE of the browser and executes your test commands remotely across the network. The Cypress engine does the opposite and directly operates INSIDE of the browser and executes your test code with the browser itself, cutting out the middle layer completely. This helps Cypress listen and modify requests at run time by manipulating the Document Object Model (DOM) and network responses instinctively. All of this allows for your tests to run faster.
Cypress is open-source and consists of Test Runner which helps you set up and start writing your tests locally. It also has a Dashboard feature which provides you with valuable insights about your tests and allows you to build up a suite of CI tests for your long-term convenience. Cypress focuses on seamless execution of end-to-end testing on the front-end and works for websites built on front-end frameworks such as Vue.js, React.js, Angular.js etc.
Perceived Limitations
1) Limited browser support.
2) Tough to read data from files.
3) Third party reporting tool integration is limited.
How to Setup Cypress for Windows
Download Node & NPM
Open a browser tab and google "download node.js". Click on the first search result. After the page loads, select and click the .msi installer for your Windows OS (either 32 or 64 bit). After the file finishes downloading, go to your download directory and double-click to start installation and follow the prompt, accept license agreement and all that good stuff, select default installation location, click on next, begin the installation. Npm is the node package manager and comes packaged with node when downloaded and it allows you to install JavaScript based frameworks. Click "Finish" after installation is complete.
Set NODE_HOME Environment variable.
The next step after installing node is to setup the NODE_HOME configuration for your system's environment variable.
1)Right click on "This PC".
2)Click on "Advanced system setting"
3)On the "Advanced" tab of the "System Properties" pop-up window, click on "Environment Variables".
4)Under "System Variables" click on "New".
5)In the pop-up window that appears, under "Variable name", type in "NODE_HOME". Under "Variable value", paste in the location on your machine where node was installed. You can find this by;
a)clicking on "This PC".
b)clicking on "program files".
c)clicking on nodejs to open the folder.
d)Right click the address bar and click on copy address.
e) paste the copied address under "Variable value".
6)Click on OK to close the pop-up window and click on Ok to close the "Environment variable" window.
After completing this, you can successfully run node on your PC
Create a Cypress Project Directory
This will server as a folder for all of our Cypress tests. You can create this folder anywhere on your PC but for convenience let's have it in the C:// drive.
1) In your C:// drive, click on "Users".
2) click on your PC NAME.
3) Create a folder called "CypressTestAutomation"
Generate package.json
This specifies and installs all of the dependencies needed to run Cypress. This can be done by following the steps below.
1)Open cmd in the CypressTestAutomation folder you just created.
a) Left click the address bar containing the file path for your CypressTestAutomation folder.
b) Type in cmd.
c) Hit Enter; after which a cmd console window should be open.
2) Type the command "npm init" and hit Enter.
3) "cypressautomation" is displayed as the package name, hit Enter.
4) When prompted to type in "description", you can either enter a brief description or leave it completely blank, when done hit Enter.
5) "entry point" is then displayed to be "index.js". Hit Enter.
6) Leave "test command", "git repository","keywords", "author", "License" completely blank by hitting Enter.
7) After the above, package.json is generated in a JSON file format to your specified location.
8)A message will ask you "Is this ok?". Respond by typing "yes" and hitting Enter. To verify successful installation, type "dir" and hit enter.
Install Cypress
1) In your existing console window, type in and run the command "npm install cypress --save-dev".
2) Node downloads and installs Cypress. This should take some time depending on your internet connection. Be patient.
Download your preferred IDE
I would recommend Visual Studio Code Editor (VSCode) due to its popularity for JavaScript. Downloading and installing via a google search should be fairly straightforward so i'll skip the details if you don't mind.
After the installation is complete and you have VScode launched, we first need to import or Cypress working directory into our VSCode IDE. Follow the instructions below.
1) Click on file, select "open".
2) Navigate to your C:// drive and proceed to the directory where you have your "CypressTestAutomation" folder created.
3) Click on the "CypressTestAutomation" folder and click "Select Folder".
4) On the left of your IDE you should be able to see your entire project directory and the files in them. These files should be named "node_modules", "{}package-lock.json", "{}package.json".
Test Runner
Now that we have Cypress successfully installed, we will take a look at how to launch the Cypress Test Runner and also explore what a typical test looks like in Cypress. Our first aim here is to launch Cypress from the VSCode terminal.
After launching VScode, click "Terminal" on the menu tab at the top of your screen. This should open a terminal at the bottom of VSCode. To start Cypress, type in the command "./node_modules/.bin/cypress open" and hit Enter. If you're running Cypress for the first time, it'll take some time for this command to run and you might get a message saying that this is your first time running cypress. You might also get an error in bold red scary text saying "Cypress verification timed out". If you do, don't panick and just run the command again. When successful, you'll get green colored text saying "Verified Cypress" and the Cypress Test Runner window opens on your machine. After running cypress, an additional folder is added to your project directory called "cypress". When you collapse this folder, you find multiple sub-folders with the integration sub-folder containing some demo test-cases. Don't worry too much about these sub-folders for now. Also, notice that these demo test cases all end with a .js JavaScript extension. If you select any demo test-case in VSCode to create a test, that test is automatically replicated in the the Test Runner window but it is advisable to only run your tests from the Test Runner window.
Running a Test-Case
On your Test Runner window, click on any test-case say "navigation.spec.js". This will automatically open another window and load all the steps from the test-case to be executed on the left side of the screen with all the green tick symbols indicating that they were executed successfully while all the actions being performed by the test are displayed on the right side of the screen. As you can see, the execution is insanely fast. Having used Selenium, i can tell you that Cypress is way faster executing test. Now you may not understand these default tests or what they do but we'll address that eventually when we write our very own test-case in next segment.
Writing your first Test-Case
As we've mentioned earlier, Cypress can automate the browsers and interact with the elements but if you want to write proper test cases and have the ability to manage these test cases in a test suite(a test suite is basically just a collection of tests that accomplish a similar purpose for example the purpose of regression. i.e a regression test suite contains tests that ensure that all the changes made to the present iteration of the software do not cause problems to pre-existing features of the software), we need to include some frameworks like Jasmine or Mocha. Think of a framework as the foundation that allows us to "build" or in our case specifically "test" software for a specific platform. Mocha is the default framework supported by Cypress and it is automatically installed when you install Cypress. I know you're excited but before we get to writing our test case, it is important to understand the structure of a cypress test case. Before that we need create the a sub-directory for our custom test cases.
1) On the left side of your IDE where you can view the project directory folders under "CypressTestAutomation", navigate to the "integration" sub-folder.
2) Right click on this and select "New Folder".
3) Name this folder "sample TC" and hit ENTER.
4) Within this folder, create a file called "TC1.js" and hit ENTER.
Structure of a Cypress Test Suite and Test Case (Mocha Framework)
Below is the basic structure of a Cypress test case. We'll go through each of the components individually just to give you a brief description of what they do so they don't appear too intimidating.
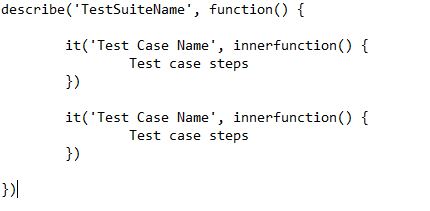
describe: method & keyword containing two arguments(i.e Test Suite Name & outerfunction). For simplicity, lets call the first "function()" parameter within the "descibe()" method the "OUTER FUNCTION". Inside this method, multiple test cases can be created using the it keyword/method.
Test Suite Name: The name of your test suite. You can call it whatever you want but for traceability, it makes more sense to use a relevant label that gives you an idea of what the test suite does.
function()[OUTER FUNCTION]: A method that starts at the first curly brace and ends at the last curly brace. Every thing within these two curly braces exists within the specified function. Multiple test cases can be defined within the original function block using the "it" keyword.
it: A keyword/method that allows multiple test cases to be defined within a function. It has two parameters, namely the "Test Case Name" and "function()". Like we did earlier, lets call the "function()" within the "it()" method the "INNER FUNCTION". Inside this function, we are going to create the steps for this test case.
Test Case Name: The name of your test case whose designation could be a hint or description of the test itself or "TC1", "TC2" and the like.
function()[INNER FUNCTION]: A method within the "it()" method that contains all the steps for a particular test case.
Now we have the basic structure of a Cypress Test case but i'd like to dive further into the INNER FUNCTION to give you further detail on what the basic javascript syntax for our usecase looks like. Like we said the context for the INNER FUNCTION has the below structure.
        it('Test Case Name', innerfunction() {
        Test case step 1
        Test case step 2
        })
The goal of our "simple" test case would be to navigate to a website, and confirm that we are on the right website by comparing the "expected title" of the web page to the "actual title" displayed on the web page. i.e step 1 & step 2 of our test case respectively; both of which as we've stated earlier belong in the INNER FUNCTION. This would look something like the snippet below.
            it('TC1', function() {
            cy.visit ('https://guru99.com/')
            cy.title().should('eq','guru99 webpage title')
            })
It is important to note that by default, cypress will support the Google Chrome browser as seen on the right side of the test runner window; test runner also shows you the version of chrome you are currently running. "cy" is a predefined Cypress object that uses the "visit()" method to navigate to a specific website; this is step 1 of our test case. The equivalent of this is selenium is "driver.get()" method which has to first invoke the selenium webdriver before navigating to the URL of choice. Just cutting out the webdriver as the middleman saves alot more time and makes Cypress faster but i digress. "cy.title().should()" method contains two parameters; 'eq' and the "expected string value" in singular quotation that the webpage title is compared to. This line of code can also be referred to an assertion command. If you've written selenium before, you can see how this is an obvious upgrade; if you haven't, i'll explain. Usually in selenium if you wanted to compare the actual and expected value of an element on a webpage, you would need to invoke the webdriver and find that element with preferrably a unique identifier via "xpath, id, className, cssselector" etc. But as we can see with Cypress in this instance, just by using the "cy.title().should" method, Cypress automatically compares both values.
Ok, so now we have our testcase and have written some javascript code to implement the steps in our testcase. After saving this file on our IDE, we need to execute the testcase via the Test Runner through the following steps.
1) Open the terminal by VSCode terminal.
2) Type in "./node_modules/.bin/cypress open" and hit ENTER to open the Test Runner.
3) When it opens, under "INTEGRATION TESTS", you should be able to find the "sample TC" folder you created earlier with the TC1.js file.
4) Click on the TC1.js file to run your sample test case.
5) If all the previous steps were properly executed, the test runner should execute the two test steps and the test should be passed successfully if expected and actual title of the webpage match.
For better "Test coverage", you can include a second test case by creating another "INNER FUNCTION" within the "describe" function. This testcase should depict a negative scenario that will fail because the actual and expected title of the website do not match.
How to run Cypress from the Command Line Interface(CLI)
Test Runner is not the only way Cypress can be run; alternatively, we can choose to bypass it entirely and run Cypress from the VSCode terminal. This can be done by executing the command; "node_modules/.bin/cypress run". This should run all the tests created under the "sample TC" folder and provide you the details and result of the test within the terminal. This process of running tests in the absence of a "User Interface" (UI) is known as running tests in "headless mode". If you're keen on viewing the UI while still executing from the terminal, you can run your test in "headed" mode by executing the command "node_modules/.bin/cypress run --headed".
If you had multiple test cases but are required to execute only specific test cases within your "sample TC" folder, then you must specify the location of the test case by executing the command below. "node_modules/.bin/cypress run --spec "cypress/integration/sample TC/TC1.js". You can obtain the location of the file by right clicking on it on your IDE and clicking on "Copy Relative Path". This command will execute in headless mode by default as it was not specified to run otherwise.
Cypress can also run on other browsers like Electron, Edge, Firefox amongst others and automatically detects the browsers on your operating system. For Firefox browsers, it only has support for versio 86 upwards. Cypress also allows tou to switch between these browsers on your Test Runner window by using the drop-down button on the top right corner. To run your test on a specific browser from the terminal, use the command "node_modules/.bin/cypress run --browser browserName" e.g "node_modules/.bin/cypress run --browser chrome". When the browser is specified, cypress executes tests in headed mode by default. However, when a browser is not specified, cypress runs in Electron browser. More of these command line (CL) commands can be found on the official cypress documentation page which i will link below.
https://docs.cypress.io/guides/guides/command-line
Before we wrap up, i would like to briefly explore our CypressTestAutomation directory just to give an better understanding of the overall structure of our project. If you collapse the "cypress" folder, a list of sub-folders appear namely; fixtures, integration, plugin, screenshot, support, videos.
fixtures : Used for maintaining test data files in Excel, XML, JSON format. Test cases requiring any form of test data access this sub-folder by default to read these files. if you quickly navigate through the JSON files in this folder, you can see that they are holding some form of data. The most detailed of which is the users.json file. You can also create your own data files for this folder in any of the mentioned formats.
integration : Used for maintaining test cases. As seen with our "sample TC" sub folder in this folder, Cypress by default checks this folder for our test cases.
plugins : Used for maintaining event listeners. Event listeners basically listen to events such as the pass/fail status of your tests. Or they manage events that trigger a particular task or action. More on this later.
screenshots : Used for maintaining screenshots taken of failed test cases.
support : this folder is used for managing reusable scripts that can be used by more than one test case.
videos : creates a video of your executed test cases.
node_modules : Contains libraries created by default when you install cypress. It also contains the cypress dependencies.
cypress.json : This file contains the cypress configurations which you can access by starting the Cypress Test Runner from your terminal with the command "node_modules/.bin/cypress open". When the Test Runner window pops open, click on the "Settings" tab, then click on "Configuration" and if you look closely enough in the bit that says "browsers", you can see all the browsers Cypress can run on your operating system. You can use this file to create custom configurations and make alterations to how you want cypress to run on your device.
package.json : Which we used to install Cypress in the first place and install its dependencies.
That's a wrap on the first post of our multi-part cypress series. Hope you've enjoyed. If you found this post helpful, you can leave a comment and share. If you have any questions that can't be solved by a google search, feel free to follow & message me on Twitter @4EVER1CONIC where i tweet some more stuff you might find useful. Part 2 of the series returns next week but until then; keep calm, stay grateful and keep coding.