QA Tester Beginner Series: A beginners guide to JavaScript Automation with Cypress (PART III)- Hooks, Fixtures and Custom Commands


For today's post, we will be taking a look at hooks, fixtures and custom commands which are some of the core competencies for cypress test automation.
Hooks in Cypress
Cypress hooks are borrowed from the Mocha framework and are responsible for organizing tests. Now you're probably asking yourself what that means so let me give you a scenario; say you were required to test functionalities of an email service like gmail for example. But to test any of those functionalities, you were required to login, test the functionality and then logout. Instead of having to repeatedly write those steps for every individual test-case, you could use hooks to define these steps once for all the multiple test-cases for which they are required. For those of you that are familiar with Selenium, think of hooks like test annotations that can be declared as pre & post requisites for certain events/test-cases.
Hooks are of four types namely;
beforeEach; Executes a specific action or block of statements every single time before a test is executed.
afterEach; Executes a specific action or block of statements every single time after a test is executed.
before; Executes an action or block of statements only once before running the test. Comes in handy when you are required to load any kind of settings or 3rd party files.
after; Executes an action or block of statements only once after running the test. Comes in handy for things like test reports. It is advisable to declare all of your hooks before (no pun intended) writing your test-cases(i.e before creating your it blocks), that way they are easier to track in the event that you are required to make some type of change.
You can demonstrate this simply by writing a test to print an output in your test runner using cy.log.
Fixtures in Cypress
A fixture is a file which usually contains some data that can be used for our test cases. The data can be in a variety of formats including json, png, xml etc. A fixture file usually consists of a key & value pair in curly braces and it can hold multiple of this pairs depending on the number of inputs required for the test-case. Suppose the test data is needed for multiple test cases, the data can be defined in the fixture file and re-use the fixture file for multiple test-cases.
This fixture file can be accessed by using the "cy.fixture()" method when the data file is not located in the "fixtures" sub folder in our cypress directory. If your fixture file is located in a sub-folder within your cypress project directory, you can access it with the "cy.fixture()" method with the sub-folder of the fixture file as a parameter. e.g cy.fixture('example') and the complete file path is not required. The opposite is the same when you create your fixture file in a different location. In this situation, we parse the location/path of the data file as a parameter into the "cy.fixture()" method. How you load a fixture file depends on the format of file. A comprehensive list of this can be found in the official cypress documentation at:
docs.cypress.io/api/commands/fixture
Let us now illustrate how we would create our own fixture with test data in json format and how to use that data in our test-cases.
When using the "cy.fixture()" to load our test data, we need to store that data in a variable that we're going to call "teedata" and we can do this by using the ".then(function(teedata))" method. This "teedata" is a local variable which holds our test data and is only accessible within the before hook/block but we need to be able to use this test data outside of the before hook/block for our test-cases. To reconcile this conundrum, we need to create another internal variable (which our test-cases can access) that will be used to save the test data. This is done by using the "this" keyword which represents the whole class and allows us to use the value parsed into it anywhere in our test-case and most especially, outside of the before block/hook.
Custom commands in Cypress
As we have already seen, Cypress provides us with some basic commands which we can employ when testing our web applications. We can also create our own custom commands by using the "command.js" file located in the "support" sub-folder in our Cypress directory. These custom commands can also be re-used in multiple test-cases.
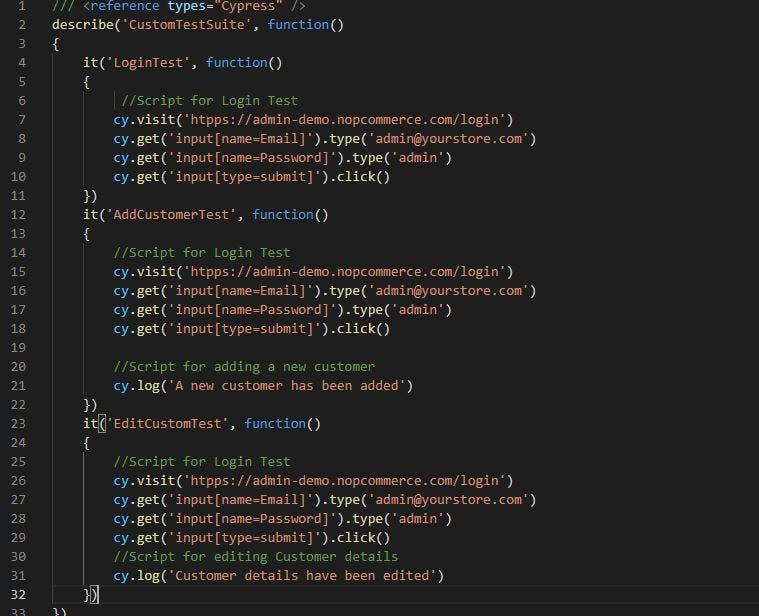
As illustrated in the image above, we can see a screenshot of the code before custom commands are implemented and our code looks pretty typical. All of the 3 test-cases in this shot require us Login with a username and password.
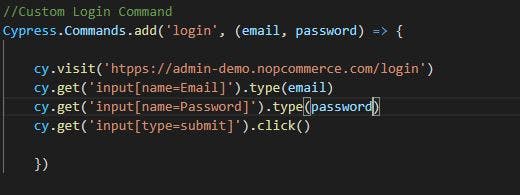
Since this process is repeated, we simplify the problem by creating a "Custom Login Command" in the "commands.js" file of the "support" sub-folder of our Cypress project directory. The "Custom Login Command" uses "Cypress.Commands.add('nameofcommand', (email, password) => { } ))"
Cypress.Commands.add('nameofcommand', (parameter1key, parameter2key) => { ... })) is an in-built Cypress customizer command.
nameofcommand: Refers to the name of your customizable command. It is advisable to give it a name similar to what its function will be.
(parameter1key, parameter2key): Refers to the two parameter keys e.g username & password whose value is required by this command for its successful execution.
=>: Indicates a JavaScript function where our execution script will be contained
{})): Contains the script for the login action we intend to perform.
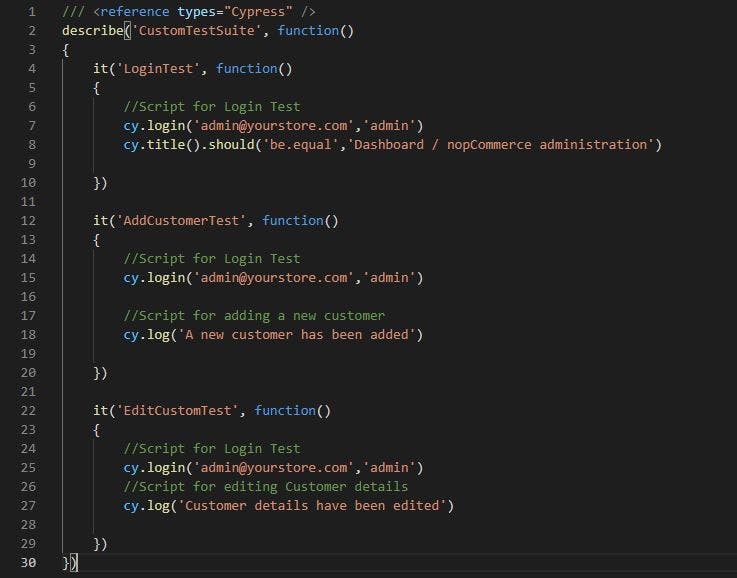
With our custom command all done, our test-cases take on a different appearance and they do not all of a sudden bear the login script like they did initially. They all contain the newly created custom command from the second screenshot which can be called using
"cy.nameofcommand('valueofparameter1key','valueofparameter2key')"
.nameofcommand: Refers to the name of your customizable command. Which in this case is "login".
valueofparameter1: Refers to the actual value of your "parameter1key" e.g the value of the username key.
valueofparameter2: Refers to the actual value of your "parameter2key" e.g the value of the password key.
They also contain code to validate the login process and also code to verify if the additional actions we intend to perform post-login have taken place.
NOTE: We do not actually perform any actions after logging in but we used a "cy.log" command to print out an expected output where that action is supposed to take place. This is just to indicate to us that our code compiles successfully up until that point and that if we do add any additional code at that point, it should be expected to run successfully.
As illustrated in the final screenshot, Custom Commands makes our code easy to read and trace should we be required to make any changes. Not to mention how its re-usability allows for better efficiency instead of repeating steps like this over and over again.
Speaking of efficiency and re-usability, the next post will be focused on exploring the Page Object Model (POM) pattern in Cypress as well as the Dashboard services and the Cypress command line. Until then, stay safe, remain grateful and keep going.